More actions
No edit summary |
|||
| (17 intermediate revisions by 2 users not shown) | |||
| Line 1: | Line 1: | ||
== Introduction == | == Introduction == | ||
This page is meant as a guideline for how to do in Catglobe | This page is meant as a guideline for how to do in Catglobe. | ||
=== Disable many users === | === Disable many users === | ||
| Line 9: | Line 9: | ||
Tools -> HR -> Users -> All users. In the search find the users that should be disabled. Open the users and click on disable. | Tools -> HR -> Users -> All users. In the search find the users that should be disabled. Open the users and click on disable. | ||
==== Disable with import ==== | ==== Disable with import ==== | ||
The date column should be text as type. I recommend that you insert a ' (apostrophe) in front of the date, then it will be regarded as text. | Your excel file shall contain 2 cells: UserId and a Date. The date has following format YYYY-MM-DD HH:MM:SS like "2010-01-01 10:00:00". The date must not be greater than your current date else you can type in whatever you like. I recommend that you use the correct date but the time isn't really important. So later on you can use this to trace back if you want to make a research for something. | ||
The date column should be text as type. I recommend that you insert a ' (apostrophe) in front of the date, then it will be regarded as text. | |||
[[Image:Disable import.gif]] | |||
Open Import wizard. | |||
[[Image:Disable import2.gif]] | |||
Find your excel file with Browse button. | |||
When the file is found and uploaded, in "User id column (optional)" select box choose UserId column from your excel (so the system knows that the user exist in the system) and click next. | |||
[[Image:Disable import3.gif]] | |||
In step 2, check on "Import user information" and "Advanced mode" as shown below. It is recommended that Advanced mode is used with care and you should limit the use of this. | |||
[[Image:Disable import4.gif]] | |||
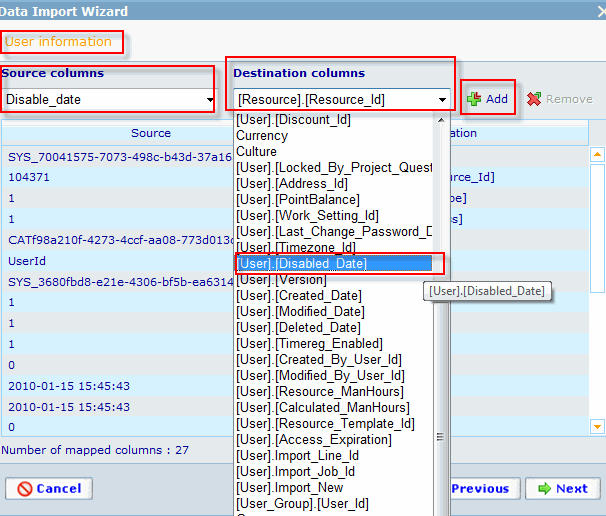
In step 3, you shall map the disable date from your excel file with the systems disable date. So in "Source columns" you shall choose the column for disable date and in "Destination columns" you should select the option called: [User].[Disabled_Date] and then click on Add. | |||
[[Image:Disable import5.gif]] | |||
You will then find your mapped data in the list as shown below.<br>[[Image:Disable import6.gif]] | |||
The last step will show you warnings of errors if there are any. If you can click on Finish buttons then you can completed the import. If not, then you should read the error message to correct the errors and redo the import.<br>[[Image:Disable import7.gif]]<br> | |||
==== Disable with cgscript ==== | |||
If you can add users to be disabled in a questionniare then you can use this script to disable the user: | |||
<br><source lang="javascript"> | |||
if(getRPQTest()) return; | |||
array user=User_getQasUser(); | |||
if(user[USER_DISABLED]==true) return; | |||
user[USER_PHONE_NUMBER]={}; | |||
if(user[USER_COUNTRY]==empty && (user[USER_ADDRESS]!=empty || user[USER_CITY]!=empty || user[USER_ZIPCODE]!=empty || user[USER_REGION]!=empty)) user[USER_COUNTRY]="dk"; | |||
user[USER_DISABLED]=true; | |||
User_save(user); | |||
</source> | |||
You can add this script on a dummy question that will be executed when the user has to be disabled or run a batch job once for all. | |||
=== Tools for import === | === Tools for import === | ||
In this file [[File:Email_validation.zip]], you will find some nice tools to Windows offices Excel that will help you with your import. | |||
The file include | |||
Catglobe.xla, which is an add-ins to Excel. It will add a menu button, so you can manipulate with the text in Excel. | |||
moreFunc, is a tool to validate the data in Excel. With this you can use regular expression, and validate the wanted text. | |||
regular expression - email check.txt, is a file that contains an expression to insert into the Excel commando line to validate the email address. | |||
To include the add-ins, you need to change the security settings for Excel. It is different from versions to version. So we recommend you to search for the answer if you can't get it to work with this guideline. | |||
In Excel 2007, the steps are: | |||
COM Add-ins can also be loaded and unloaded through the Excel 2007 user interface. To do this, follow these steps: | |||
1. Click the Microsoft Office Button, and then click Excel Options.<BR> | |||
2. Click Add-Ins.<BR> | |||
3. Under Manage, click COM Add ins, and then click Go .<BR> | |||
4. In the Add-Ins dialog box, click Automation. In the list of registered COM servers,click on Catglobe.xla, and then click OK. | |||
<BR> | |||
You can see the whole guideline here: | |||
[http://support.microsoft.com/kb/291392 http://support.microsoft.com/kb/291392] | |||
When you are done, you will see a select box called Catglobe under Add-Ins tab menu. | |||
[[Image:Importtools1.gif]] | |||
Pling, will convert the marked cells to type text. | |||
Proper, will capital first letter and the rest in small case. | |||
Lower, will change all text to lower cases. | |||
Upper, will change the text to upper cases. | |||
''' Email validation '''<BR> | |||
Before this will work the steps to enable add-ins (step 1-3) has to be done. | |||
Click on the setup.exe, and complete the installation. | |||
Now open the file with the emails that has to be validated. | |||
Insert this command (that is the text file): | |||
=REGEX.COMP('''E2''';"^[_a-zA-Z0-9-]+(\.[_a-zA-Z0-9-]+)*@[a-zA-Z0-9-]+(\.[a-zA-Z0-9-]+)*\.(([0-9]{1,3})|([a-zA-Z]{2,3})|(aero|coop|info|museum|name))$") | |||
Edit the E2 commando to the cell that contains the email address, and then click on enter. | |||
The cell will return TRUE/FALSE. The email is valid when it is mark as true. | |||
[[Image:Importtools2.gif]] | |||
[[Category:Production_guidelines]] | |||
Latest revision as of 06:40, 22 April 2013
Introduction
This page is meant as a guideline for how to do in Catglobe.
Disable many users
You can either disable users with import or run a batch script to disable them.
If you will disable a few users, then it is easiest to do it from user module. Tools -> HR -> Users -> All users. In the search find the users that should be disabled. Open the users and click on disable.
Disable with import
Your excel file shall contain 2 cells: UserId and a Date. The date has following format YYYY-MM-DD HH:MM:SS like "2010-01-01 10:00:00". The date must not be greater than your current date else you can type in whatever you like. I recommend that you use the correct date but the time isn't really important. So later on you can use this to trace back if you want to make a research for something.
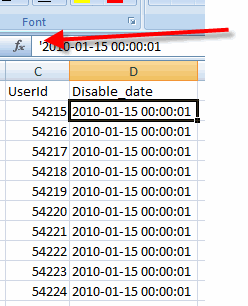
The date column should be text as type. I recommend that you insert a ' (apostrophe) in front of the date, then it will be regarded as text.
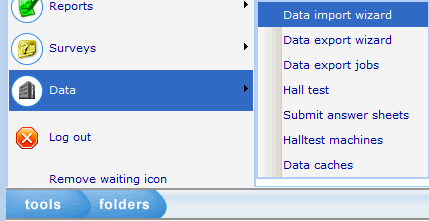
Open Import wizard.
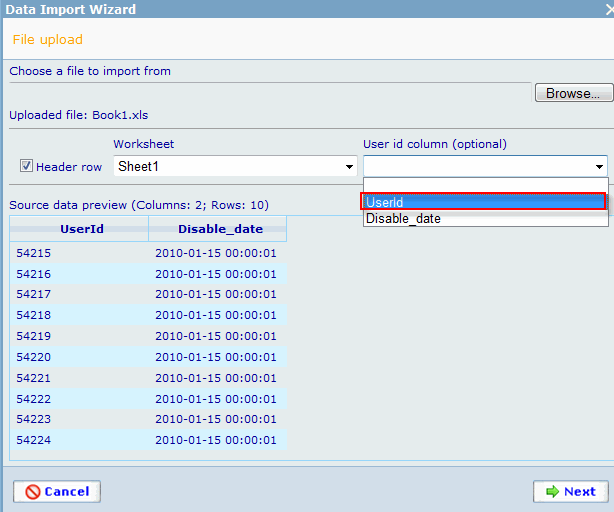
Find your excel file with Browse button.
When the file is found and uploaded, in "User id column (optional)" select box choose UserId column from your excel (so the system knows that the user exist in the system) and click next.
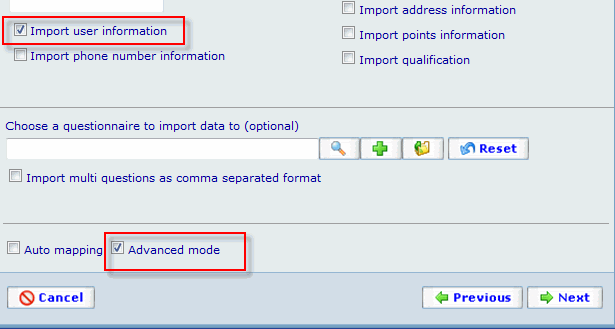
In step 2, check on "Import user information" and "Advanced mode" as shown below. It is recommended that Advanced mode is used with care and you should limit the use of this.
In step 3, you shall map the disable date from your excel file with the systems disable date. So in "Source columns" you shall choose the column for disable date and in "Destination columns" you should select the option called: [User].[Disabled_Date] and then click on Add.
You will then find your mapped data in the list as shown below.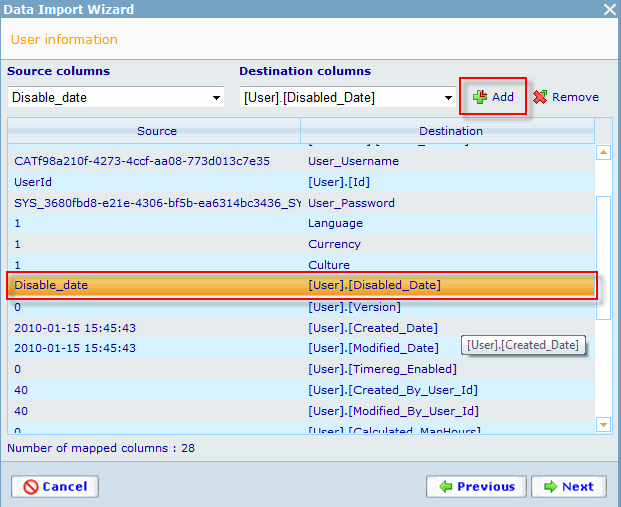
The last step will show you warnings of errors if there are any. If you can click on Finish buttons then you can completed the import. If not, then you should read the error message to correct the errors and redo the import.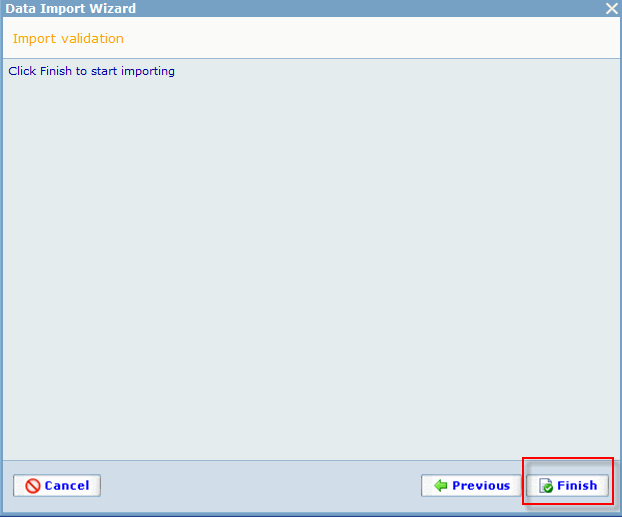
Disable with cgscript
If you can add users to be disabled in a questionniare then you can use this script to disable the user:
if(getRPQTest()) return;

array user=User_getQasUser();
if(user[USER_DISABLED]==true) return;

user[USER_PHONE_NUMBER]={};
if(user[USER_COUNTRY]==empty && (user[USER_ADDRESS]!=empty || user[USER_CITY]!=empty || user[USER_ZIPCODE]!=empty || user[USER_REGION]!=empty)) user[USER_COUNTRY]="dk";

user[USER_DISABLED]=true;
User_save(user);
You can add this script on a dummy question that will be executed when the user has to be disabled or run a batch job once for all.
Tools for import
In this file File:Email validation.zip, you will find some nice tools to Windows offices Excel that will help you with your import. The file include Catglobe.xla, which is an add-ins to Excel. It will add a menu button, so you can manipulate with the text in Excel. moreFunc, is a tool to validate the data in Excel. With this you can use regular expression, and validate the wanted text. regular expression - email check.txt, is a file that contains an expression to insert into the Excel commando line to validate the email address.
To include the add-ins, you need to change the security settings for Excel. It is different from versions to version. So we recommend you to search for the answer if you can't get it to work with this guideline.
In Excel 2007, the steps are: COM Add-ins can also be loaded and unloaded through the Excel 2007 user interface. To do this, follow these steps:
1. Click the Microsoft Office Button, and then click Excel Options.
2. Click Add-Ins.
3. Under Manage, click COM Add ins, and then click Go .
4. In the Add-Ins dialog box, click Automation. In the list of registered COM servers,click on Catglobe.xla, and then click OK.
You can see the whole guideline here:
http://support.microsoft.com/kb/291392
When you are done, you will see a select box called Catglobe under Add-Ins tab menu.
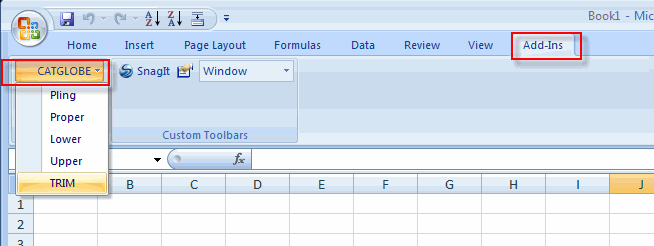 Pling, will convert the marked cells to type text.
Proper, will capital first letter and the rest in small case.
Lower, will change all text to lower cases.
Upper, will change the text to upper cases.
Email validation
Before this will work the steps to enable add-ins (step 1-3) has to be done.
Click on the setup.exe, and complete the installation. Now open the file with the emails that has to be validated. Insert this command (that is the text file): =REGEX.COMP(E2;"^[_a-zA-Z0-9-]+(\.[_a-zA-Z0-9-]+)*@[a-zA-Z0-9-]+(\.[a-zA-Z0-9-]+)*\.(([0-9]{1,3})|([a-zA-Z]{2,3})|(aero|coop|info|museum|name))$")
Edit the E2 commando to the cell that contains the email address, and then click on enter.
The cell will return TRUE/FALSE. The email is valid when it is mark as true.


