More actions
No edit summary |
No edit summary |
||
| (One intermediate revision by one other user not shown) | |||
| Line 1: | Line 1: | ||
== Setting up detailed description == | |||
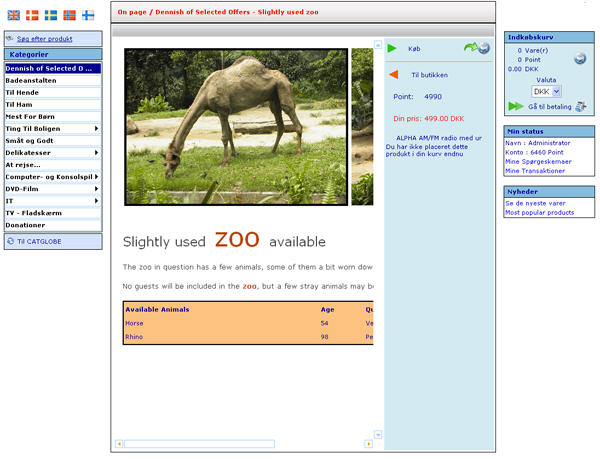
The detailed description of a product is the one you see when you click on the product from the main web shop page. This will lead you to a page, where you can see a detailed description of the product including many images and styles for the text. Please see the below example for how a detailed description may look. | |||
[[Image:1709.jpg|600px|Detailed product description]] | |||
In this example the area used in width is larger that the available immediate view area and a scrollbar will appear making it possible for the shopper to see all. | |||
The detailed description is set up inside the product dialog using a standard HTML editor. The following is a short description on how to use the standard elements of the editor, but also some explanation of the more advanced features specific for Catglobe. | |||
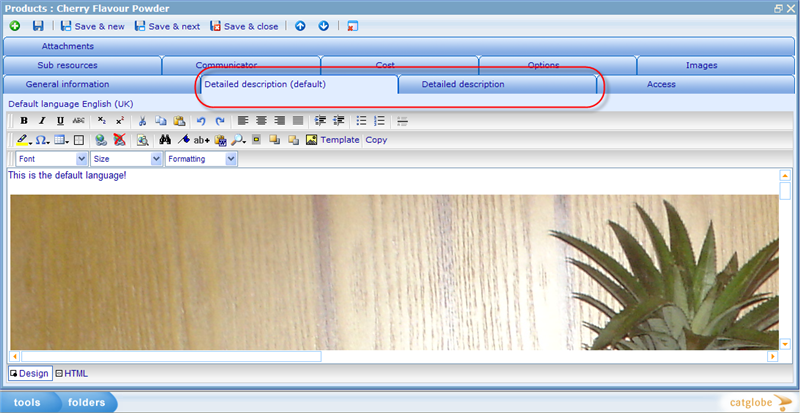
When viewing the editor, the default language (as set on the product's general information tab) will always be shown on the 'detailed description (default)' tab. This way it is easy to copy graphics, formatting and text to a new language that can be chosen on the 'detailed description' tab! | |||
[[Image:4355.png|800px|Product5-4-1]] | |||
In each editors top bar you will find the basic editor buttons, like Cut, Copy, Paste, Preview, Print, Insert table, Cell Editing, and Table configuration buttons. These we presume to be self explanatory and no further information will be given. | |||
In | In the second menu bar you will find buttons enabling font styles, sizes, colors, alignment, and bullet & tab features for text. These we also presume to be self explanatory. | ||
Finally in the third row of icons are the following buttons. | |||
'''Horizontal line:''' Places a horizontal line where your cursor is. A good tool to split the page up into sub sections.'''Insert hyper link:''' Highlight the text you want to act as a hyper link and click this button. You can then specify where the link will lead to once clicked.'''Remove hyper link:''' In order to use this button you need to highlight the sentence or word onto which you have already placed a hyper link.'''Insert Marquee: '''This is a small "funky" feature that makes it possible for you to create a small scrolling text in your html page. This can help show a lot of information in limited space.'''Save:''' Will save the detailed description to the core information tab, but remember that you need to save the product as well in order to save your changes to the database. | |||
If you want to create even more advanced detailed descriptions you can click the HTML button in order to manipulate the html of the page. This will provide you with almost unlimited flexibility | |||
== "Template" drop down == | |||
In the Template drop down you will find a list of "product templates" that will help you set of your initial HTML for any new product detailed description. These product templates are some that you yourself can set up - please click here to read more on how to do this. These defaults will help you maintain a common look and feel for all your detailed descriptions; and of course, make the work quicker and simpler. | |||
== Merge fields == | |||
Since some information that you show in the detailed description may change over time, and you will not want to go in and change these information all the time, we offer some merge fields for you to use. Merge fields are tags that will be replaced with database information whenever a user views the detailed information. An example of a merge field used in a description may be: | |||
''<nowiki>The price of the product you have to pay is only [[Price]], which is a lot cheaper than the recommended market price of [[Recommendedprice]].</nowiki>'' | |||
''<nowiki> | '''Below is the full list of merge fields that exist:''' <br> ''<nowiki>[[DefaultImage]]</nowiki>'' to be used in image viewing. <br> ''<nowiki>[[Price]]</nowiki>'' to show the users price in users currency. <br> ''<nowiki>[[RecommendedPrice]]</nowiki>'' to show the recommended price in users currency. <br> ''<nowiki>[[SumDelivered]]</nowiki>'' = the amount of default currency spent on the product where the orders containing the product have been delivered. <br> ''<nowiki>[[SumDelivered,USD]]</nowiki>'' = the amount of money in USD spent on the product where the orders containing the product have been delivered. (USD is the short name for the currency and can be replaced with any currency on the currency table). <br> ''<nowiki>[[SumPending]] </nowiki>''= the amount of default currency spent on the product where the orders containing the product have NOT been delivered. <br> ''<nowiki>[[SumPending,USD]]</nowiki>'' = the amount of money in USD spent on the product where the orders containing the product have NOT been delivered. (USD is the short name for the currency and can be replaced with any currency on the currency table) | ||
An example of the usefulness of the lower 4 merge fields is the following. | |||
''<nowiki>So far shoppers on this site have donated [[SumDelivered]] USD for Red Cross paying 20 USD each. Catglobe futher has pending [[SumPending]] USD to donate to Red Cross.</nowiki>'' __NOTOC__ <!-- imported from file: 1311.htm--> | |||
[[Category:Adding_products]] | |||
Latest revision as of 08:27, 5 March 2012
Setting up detailed description
The detailed description of a product is the one you see when you click on the product from the main web shop page. This will lead you to a page, where you can see a detailed description of the product including many images and styles for the text. Please see the below example for how a detailed description may look.
In this example the area used in width is larger that the available immediate view area and a scrollbar will appear making it possible for the shopper to see all.
The detailed description is set up inside the product dialog using a standard HTML editor. The following is a short description on how to use the standard elements of the editor, but also some explanation of the more advanced features specific for Catglobe.
When viewing the editor, the default language (as set on the product's general information tab) will always be shown on the 'detailed description (default)' tab. This way it is easy to copy graphics, formatting and text to a new language that can be chosen on the 'detailed description' tab!
In each editors top bar you will find the basic editor buttons, like Cut, Copy, Paste, Preview, Print, Insert table, Cell Editing, and Table configuration buttons. These we presume to be self explanatory and no further information will be given.
In the second menu bar you will find buttons enabling font styles, sizes, colors, alignment, and bullet & tab features for text. These we also presume to be self explanatory.
Finally in the third row of icons are the following buttons.
Horizontal line: Places a horizontal line where your cursor is. A good tool to split the page up into sub sections.Insert hyper link: Highlight the text you want to act as a hyper link and click this button. You can then specify where the link will lead to once clicked.Remove hyper link: In order to use this button you need to highlight the sentence or word onto which you have already placed a hyper link.Insert Marquee: This is a small "funky" feature that makes it possible for you to create a small scrolling text in your html page. This can help show a lot of information in limited space.Save: Will save the detailed description to the core information tab, but remember that you need to save the product as well in order to save your changes to the database.
If you want to create even more advanced detailed descriptions you can click the HTML button in order to manipulate the html of the page. This will provide you with almost unlimited flexibility
"Template" drop down
In the Template drop down you will find a list of "product templates" that will help you set of your initial HTML for any new product detailed description. These product templates are some that you yourself can set up - please click here to read more on how to do this. These defaults will help you maintain a common look and feel for all your detailed descriptions; and of course, make the work quicker and simpler.
Merge fields
Since some information that you show in the detailed description may change over time, and you will not want to go in and change these information all the time, we offer some merge fields for you to use. Merge fields are tags that will be replaced with database information whenever a user views the detailed information. An example of a merge field used in a description may be:
The price of the product you have to pay is only [[Price]], which is a lot cheaper than the recommended market price of [[Recommendedprice]].
Below is the full list of merge fields that exist:
[[DefaultImage]] to be used in image viewing.
[[Price]] to show the users price in users currency.
[[RecommendedPrice]] to show the recommended price in users currency.
[[SumDelivered]] = the amount of default currency spent on the product where the orders containing the product have been delivered.
[[SumDelivered,USD]] = the amount of money in USD spent on the product where the orders containing the product have been delivered. (USD is the short name for the currency and can be replaced with any currency on the currency table).
[[SumPending]] = the amount of default currency spent on the product where the orders containing the product have NOT been delivered.
[[SumPending,USD]] = the amount of money in USD spent on the product where the orders containing the product have NOT been delivered. (USD is the short name for the currency and can be replaced with any currency on the currency table)
An example of the usefulness of the lower 4 merge fields is the following.
So far shoppers on this site have donated [[SumDelivered]] USD for Red Cross paying 20 USD each. Catglobe futher has pending [[SumPending]] USD to donate to Red Cross.


