More actions
No edit summary |
No edit summary |
||
| Line 1: | Line 1: | ||
[[Category:Coding | [[Category:Coding module2]] | ||
| | ||
Revision as of 08:15, 12 May 2011
Coding
Once a coding job is created, it is ready for coding. To find any coding tasks that you may code you can go to two places:
By choosing the coding tab of questionnaire
By choosing “My coding tasks” in “My activities” under Tools -> Personal
Once you click here a list of coding jobs will be displayed. Please notice that the coding job needs to be set to Active in order to be listed in MyCoding Tasks under MyActivities.
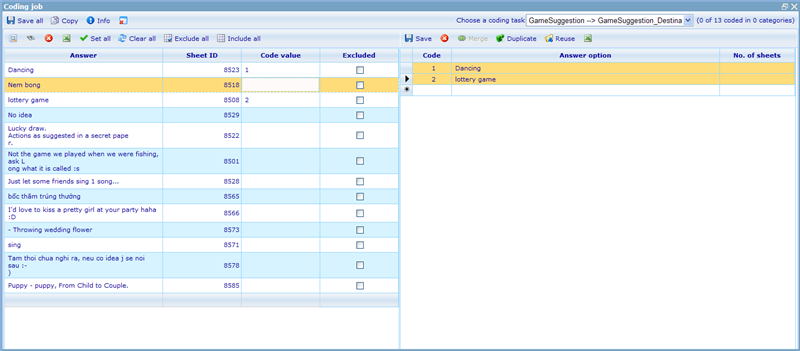
Highlight a coding job and click “Code” to open the coding form, which looks like below:
You will in the coding form be able to perform a number of actions during your coding process, each explained in turn in the following:
Choose a coding task: Since you as a coder may have been assigned multiple coding jobs for the specific questionnaire, each of these will be displayed in a dropdown list. Before performing the coding, it is required to choose the coding task. By default the first coding task will be displayed. Once the coding task is chosen the uncoded answer sheets and possible answer options, if any, are filled in the respective grids.
Left grid/list: The source question answers. A list of answers, the questionnaire answer sheet from where they came, and an insert column for the code value (will be explained later). Finally an excluded column, which can be used to exclude answers that you are not sure what to do with. These answers can then later be reviewed again by the coder or a supervisor by including them in a search. Please look further down to understand how to include excluded answers in the list.
Right grid/list: The destination question options. These records show the closed options that currently exist for the destination questions, the “code” that is used to link the closed options to open answers (put into the code column on the left list) and the number of questionnaire answer sheets that have currently received the specific code. Please notice that it is ALWAYS the default language you will code to, no matter if the language of the coder already exists for the questionnaire being coded. It is possible to sort this list by clicking one any of the three column headers (Code, Answer option, No. of sheets).
Copy: If you have an open answer in the source question which you wish to use for an answer option in the destination question, then choose a record in the left grid and click this button. This will add a new answer option to the right grid with a copy of the highlighted records answer. It will further insert this new options code in the code value of the records coding value column.
Info: Details about the chosen coding task are available by clicking on the info button. This information will assist the coder in how he should work on this specific coding task. It will also help coder to presume possible answer options by reading the source question.
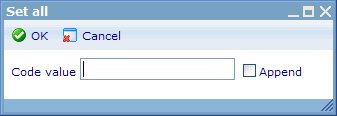
Set all: It is possible to enter same code values for all records of the left grid by using this feature. The coder can search for a particular text and if he feels that the resulting records all can fit under the same code value he can click this button and the below dialogue will appear.
By setting in a code value and clicking “OK” he can quickly update all the left grid code values. The append check box defines whether or not the set values will be added to existing coded values of the users (when checked) or if they will overwrite any coded values that may exist (when unchecked).
Remember to click “Save all” to save the changes you made.
Clear all: If you started coding and found out that everything is wrong, you can search for those records that were mistaken and click clear all, and the entire code value column will be left blank. By clicking save you will remove any coding that was done for the listed open answers.
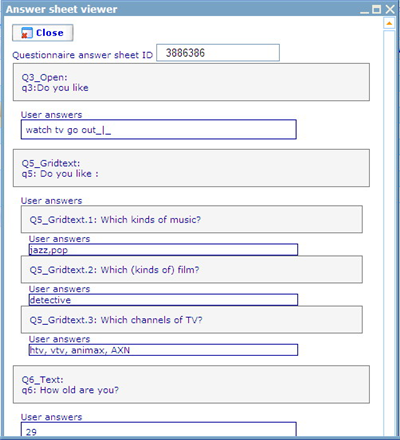
View answers: The answers of all open type questions are displayed for the selected answer sheet when highlighting an answer in the left grid and clicking “View answers”. The main purpose of this is to show the coder information about the whole questionnaire, so that the coder has an idea about the context in which an answer was given. If we, e.g. have an answer to a question saying; “The same as I answered in the previous question” it will be hard to code without having the possibility to research what was then answered in the prior open question. Below you can see an example of how such a dialogue may look.
Search answers: A coding task may consist of 1000s of records that need to be coded. By default the coder will receive 20 open and un-coded answers at a time. If the user wants to code using a less random approach it is also possible to search for the open answers he or she wants to code by defining timeframes for the answers you want. Another option is specifying a word or phrase that needs to appear in an open answer for it to be returned from a search (in 'Search answers from source questions'). This combined with the “Set all” feature is very useful for increasing the speed of the coding process.
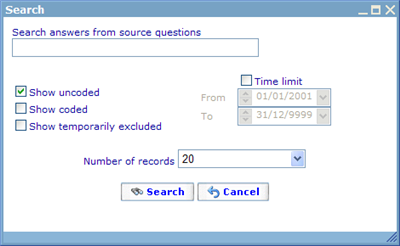 If we want to recode some answers then we can also search for both already coded answers. There is also an option to limit the number of answers you want to code by only searching for those answers given between a certain start and end date. This is done using the time limit settings shown above.
As explained earlier, it is also possible to exclude some answers, which you are not really sure what to do with yet. To return to see these excluded answers you need to click the 'Show temporarily excluded' check box.
Merge answer options: What often happens when you are coding is that you start to create some answer options to group the open answers into, but later find out that this grouping can be made better. This sometimes means that you want two answer options, that you find are quite identical, to be merged into one. The effect of merging two options is that all the earlier open answers that were coded to one of the two options will be changed to the new merged option. In other words, you do not need to worry about cleaning up the options that had already gotten assigned the two options prior to merging - the system will automatically handle.
Reuse: Using this button it is possible reusing the answer options from a different question in the same questionnaire. If you click the button the following dialogue will be given. You can then choose among all the questions in the questionnaire that has answer options.
If your destination question already has some of the answer options from the question from which you wish to import, these options will be ignored. Only the options which are new and unique will be imported. They will not keep their original code value but be assigned new unique code numbers once imported.
Duplicate: A pretty simple feature that will make a copy of an answer option if highlighting an existing option in the right grid.
Export to Excel: Will export the full list of options to excel. This is useful if the list is very long and the coder rather want to look up the code value on a separate piece of paper than on the screen.
Exclude all/Include all: A quick way to check all answers in your current left grid to be excluded. As earlier explained, exclusion is meant to be used for saving the decision of some answers for later or for a supervisor to decide on.
How to code
The typical coding process starts with the coder choosing which open answers to code. This is done using the search feature for updating the left grid. Once this grid is updated the coder usually starts with the top record and looks at whether the open answer logically corresponds to any existing answer option in the right grid. Often, when just starting on a coding task, there will not be any answer options for the destination question yet, and the coder will have to create these.
The coder will then have to start adding answer options that will correspond to the open answers given. This can be done using the following methods.
The coder can manually type in new answer options. Just use the last row in the list identified by “…” to add a new option. The lowest not already existing code value will by default be assigned to the new option. Once this row has been used a new “…” row will appear to allow the coder to add more new options.
The code can also add new answer options by using the “reuse” and “duplicate” buttons as explained earlier.
If we think that the text of the answer sheet is useful as a new answer option we can highlight the answer sheet and click the “Copy” button to copy it from left grid to right grid.
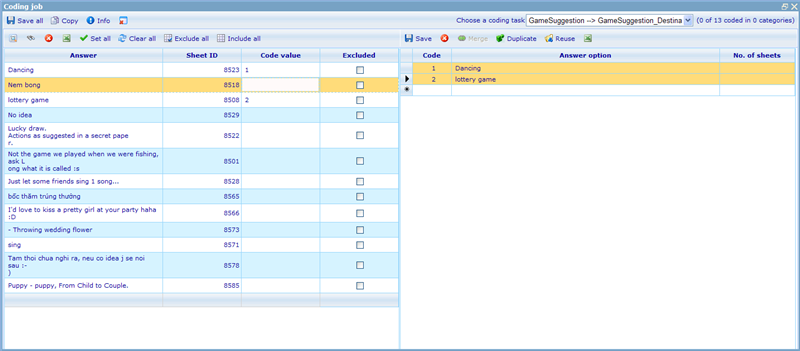
Once we have the answer option(s) that we need to code a source question we activate the code value cell as shown below and type in the matching destination code(s).
We can the insert one coding value if the destination question is a single type question and one or more codes if the destination question is a multi type question. When coding to multi type questions we separate individual coding values for the same source answer with “spaces”. If the destination question is a single question, spaces will not be allowed.
The order of the codes inserted does not matter; “2 5 7” is identical to “5 2 7”. Once you load a coded option is will although always list the coding in numerical order, i.e. “2 5 7”.
To move up and down between active cells while coding you can use the up and down arrows. Also the return button can be used to move to the cell just below the highlighted one.
You are allowed to insert coding values that do not exist in the destination options, but you need to then add them before you click “save all”. If on save, a coded value does not exist in the destination options, you will receive an error.
Once you have coded all the left grid records you must click “save all” before making a new search. Your changes are NOT saved in the “background” so it is important you save each time you have coded in the left grid and want to continue with a different search. The same logic applies to changing coding tasks. Before doing this you should save your left grid work; else it will be lost.
Every time you click “save all” the prior search made will be carried out again and update the left grid. I.e. if your earlier search was the typical default search (return all un-coded), then you will be returned the next 20 un-coded source answers. This nicely supports the typical coding process where you code a number of open answers then save and continue with the next array of open answers until you finally reach the end of the list and have finished.
It is possible to change the code of an answer option as long as the new value you give it is unique. This can be done by clicking and updating directly in the code cell on the right grid. If you change the code of an answer option and click save it will clean up any unsaved coding to this option in the left grid list as well. The “recoding” will not only happen for the unsaved list but also for already saved and coded source answers. If you change a code from e.g. 3 to 99, then when looking at all earlier coded records, the value 3 will now read “99”.
A similar logic applies to changes to the destination answers done using delete and merge. If any source answer was coded to a destination option that was merged into a new option (both saved and not saved), the existing options will be updated to reflect this change. If you delete an answer option, then any codes pointing to this answer options will be removed. This may mean that some answers that were earlier coded will no longer have codes and need re-coding.
Changes in the answer option list are done when clicking the save button on top of the right grid or when clicking the “save all” button. The “No. of sheet” calculations are only re-done after clicking “save all” button, since no change is expected to have happened with no change yet in the source answers.


