The navigation tab helps users set up the menu of the monitor site.
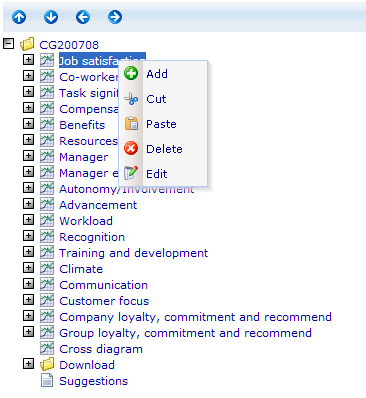
For a new site there will only be one node, to which you can add children nodes. The nodes of the menu can be moved around later by using the arrows in the tool bar. You can also cut, paste and delete nodes in the menu by using the right click menu choices.
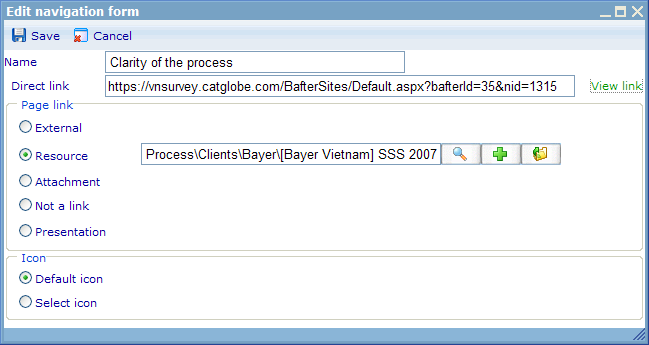
Let us look at what needs to be defined when adding and editing nodes of a menu item.
First of all, the node of course needs a name. This name will appear on the nodes the clients see.
Direct link is a link that can be given to users instead of the main link for the Monitor site. With these "page/menu item" specific links the users will instantly be directed to the chosen page of the monitor site. To see how any of these links work please click the "View link" button next to the field.
Page link
You then need to decide on what will happen when you click the link. There are here 5 options available! Each are explained in turn below:
External: Here you can enter a normal web address to link to a page on the web, e.g. 'http://www.catglobe.com'
Resource: You can here choose between reports and diagrams in the system. If you choose a diagram it will be displayed with the filter area in the top of the view page and the diagram result in the bottom. If you choose a document report it will be displayed with a pager in the top and the document as HTML in the bottom. If you choose a presentation type report, it will immediately open when you click on the node in the menu.
Attachment: You can here choose among the attachments you have placed under the attachments tab of your monitor resource. When used in the monitor site it will immediately open the attachment once the user clicks on it.
Not a link: When clicking on menu items with this type, nothing will happen. It is generally used as parent nodes to hold other menu items.
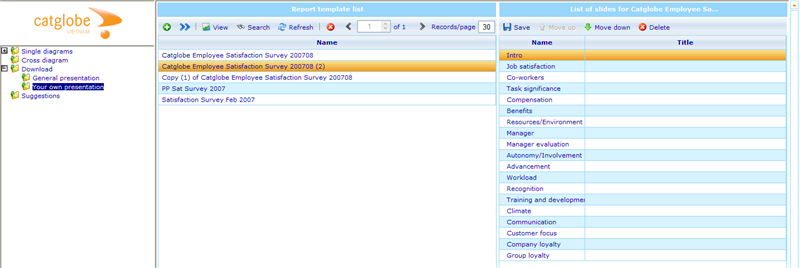
Presentation: When choosing this option a page similar to below will appear when users click on the node from the site interface!
In the left side list you will have access to a small version of the report template list showing presentation type report templates. By highlighting one of these and clicking on the right direction arrow '>>' you will immediately see all the slides that exist in that template on the right side list. From here you can then change the order of slides, delete slides and apply titles to slides. Titles will appear in the top of the slides as text objects. This feature is useful since it works together with a feature where you can add images created in the dynamic diagrams as slides to existing report templates.
Icon
From version 5.4 the 5 different types of links that have different standard icons. It is also possible to add your own icons to nodes of the tree. This you can do by adding images to the image tab of monitor and then choosing the image under 'select icon' for the node in question. Please ensure that the images you use for icons are 16x16.
If you have chosen to ignore navigation access you do not need to set up the following. Ignoring navigation access is not available until v5.4. Notice that another access problem that users may encounter is if their user resource template type does not give them rights to view monitor sites. This will also restrict them from seeing any monitor sites. To read more on solving this problem please click here.
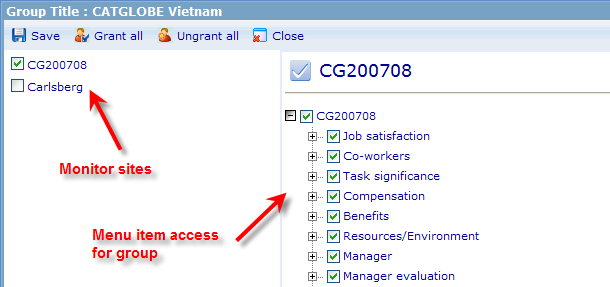
To ensure that a user or group has the right to see menu items you must go to the group or user resource lists and open the 'Customized navigation access' dialog, which you will find in the Access drop down.
This dialog will give you the possibility of granting access to the menu items that you believe the group or user you opened the dialog for should have. On the left side you will see all the Monitor sites that you yourself have access to, whereas the right side will show you all the menu items in that monitor site. The grant and un-grant all buttons is a quick way to check or un-check all check boxes at once.


