Import module
The import module of Catglobe can do two things
- Add and update user information into Catglobe
- Add and update data of questionnaire in Catglobe
To access the Import Module you should go to
Tools-> Data -> Data Import Wizard
The wizard can import both new user and questionnaire data, or a combination of both. It can also update existing users’ information and data if you know the required foreign keys of the places to which you want to import.
The following file will lead you through the 5 steps of the import wizard. If you wish to learn more on the rules of importing specific user information and data you can look at the detailed help files under this file! Links will be show where applicable in the text.
Step 1: Choosing the data you will import
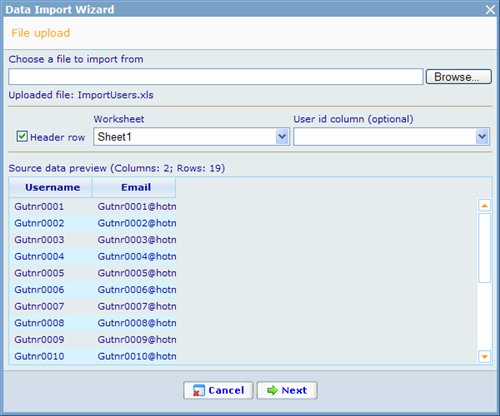
In this step we can choose a source file containing the user and questionnaire data we want to import. The only format that is currently supported for import is MS excel (97-2003 formats).
Choose file to import from: Click browse to select a file containing data we want to import. This file must be an .xls file. If not, we will receive an error message and must choose a file of the correct format.
Work sheet: This drop down list will display all the work sheets in the MS excel file we have selected. In other words it is only possible for us to import from one work sheet at a time.
Source Data Preview: Whenever we select a work sheet, the grid below source data preview will show the data inside this work sheet. As it is only for previewing, it will display no more than 20 rows.
Header row: If this check box is checked, the system will understand that the first row of the import file is the header, and the real data is from the second row to end. Otherwise, the system will create headers F1, F2, etc. and all of the content of the work sheet will be imported.
User id column (optional): This drop down list displays all the headers of the file. In case we want to use existing user in the import job, we have to select a column containing users’ id. Otherwise, we should leave it blank. Already in this step we have to decide whether we are importing data to existing users or new users. It is NOT possible to import to both new and existing users in the same import. Please click here to read more on the “User Id” column.
Step 2: Choosing where to import the data to
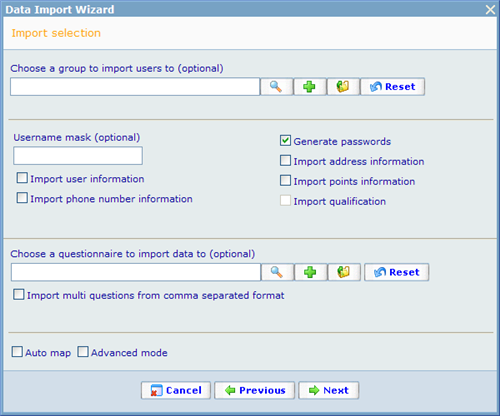
This step allows us to specify some general filters on what we want to import and where the data should be imported to.
Choose a group to import users to (optional): When importing users we can choose one group into which the users can be added no matter whether they are new users or existing users. We can search for an existing group by using Search function or create a new group by clicking the Add button (the plus sign). By clicking the Reset button we can clear this field.
If this field does not have a value the system may instead look for group id’s in our imported MS excel data to find out if the imported users should be attached to some group. Using the MS excel gives us the added flexibility of importing each user to different groups. To read more on importing users to groups, please click here.
User name mask: Makes it possible for us to specify how the user name of new created users will look. Please click here to read more on the import of user names.
Import user information: Checking this check box allows us to add core information to new users or to update existing users’ core information. The core information that will be allowed you to import in the next step is:
- User name: click here to learn more!
- Password: click here to learn more!
- First name: click here to learn more!
- Middle name: click here to learn more!
- Last name: click here to learn more!
- E-mail address: click here to learn more!
- Language: click here to learn more!
- Currency: click here to learn more!
- Culture: click here to learn more!
Import phone number information: Checking this check box allow us to import/update users’ phone numbers and fax numbers. Click here to read more on what columns in Catglobe you can import these numbers to.
Import address information: Checking this check box allow us to add address information to new users or to update existing users’ address information. The address information that will be allowed you to import in the next step is:
- Address: click here to learn more!
- City: click here to learn more!
- Region: click here to learn more!
- Zip code: click here to learn more!
- Postbox: click here to learn more!
- Web site: click here to learn more!
- Country: click here to learn more!
Import points information: Checking this check box allow us to insert or withdraw points to new or existing users points accounts in Catglobe. The point information that will be allowed you to import in the next step is:
- Points: click here to learn more!
- Points timestamp: click here to learn more!
- Points description: click here to learn more!
Import qualifications: Checking this check box allow us to insert or update qualification of new or existing users. The qualification information that will be allowed you to import in the next step is:
- Qualification: click here to learn more!
- Qualification Level: click here to learn more!
Generate passwords: If the check box is checked, the system will create random passwords for users. Since you may also choose to import passwords specified in excel and passwords can also be fixed password, please refer to the following file to learn more.
Choose a questionnaire to import data to (optional): If you wish to also import data for the existing or new users you have specified, you need to choose the questionnaire into which this data will be placed. This of course means that you will need to make sure that the data you import fits with the questions available in the questionnaire. It is possible using the import function to add and update data for users, so be careful what you do. Use the button with the magnifying glass to find the questionnaire you wish to import to.
Import multi questions from comma separated format: When this column is checked, then the format of multi questions will be expected to have all true answer options listed by their answer option id, rather than by the traditional binary format. E.g. instead of the format "0101" it should get "2,4" or "4,2". The advantage of the comma separated format is, that the import can also include the users' selection order as part of the information. "4,2" would mean that the user, when answering the multi question, first chose 4 then 2. "2,4" would have meant the opposite, namely that the user first chose 2 then 4, when checking these two options for the multi question.
If you are importing to existing users you must then choose one of three options. These options specify what will happen with existing questionnaire answer sheet of the questionnaire when importing data.
The three options are:
Option 1: To be chosen when you know that each user has only zero or one questionnaire answer sheet for this questionnaire. By selecting this option, system users must be sure that every imported User has only zero or one questionnaire answer sheet for the selected questionnaire. An error will be shown during the validation step if any users have more than one, when you in the final step of the wizard will try to import and the option is not adhered to in Catglobe.
Option 2: To be chosen when you want to delete all existing questionnaire answer sheet for this questionnaire of the user for whom you are importing data. This option is only available if the current user has the necessary navigation access to do this. If not, the option will be disabled and only options 1 and 3 will be available.
Option 3: Select this option if you have a column specified in the MS excel file you stating the id of the questionnaire answer sheet you will be importing to (Resource_Project_Questionnaire_Id in Catglobe database). If you choose this, a drop down list will appear asking you to specify the column where this data exists. If the user to which you are importing has more answer sheets for the questionnaire of course these will not be affected. If any imported record does not have values in this column it will be seen as an error and the import cannot be carried out. If any ID is not recognized when importing, the row in question will be ignored.
When we import we choose specific questions in the questionnaire to import to. The logic of how the data needs to be set up in our import file depends on the question types we are importing to. The different question types that we have are:
- Text question: click here to learn more!
- Number question: click here to learn more!
- Single question: click here to learn more!
- Multi question: click here to learn more!
- Scale question: click here to learn more!
- Grid single question: click here to learn more!
- Grid multi question: click here to learn more!
- Grid scale question: click here to learn more!
- Grid text question: click here to learn more!
- Multimedia question: click here to learn more!
- Open question: click here to learn more!
Auto map: When this check box is checked, the system will automatically map the import file’s columns with those in the system if the headers are exactly the same. Each of the help files that you can find related to this guide tells you what that header must be. If any header is not auto-mapped, columns must be mapped one by one.
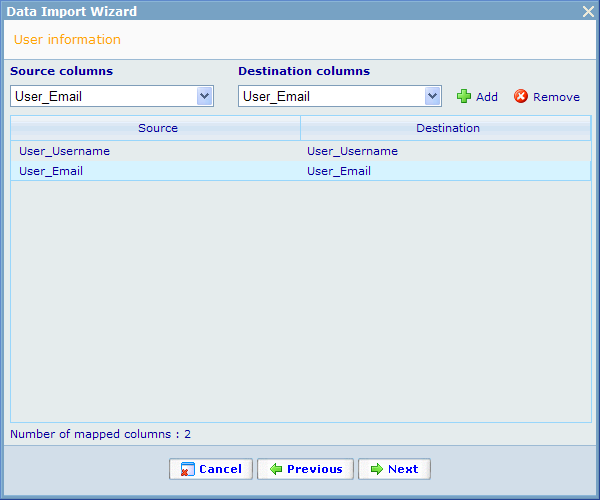
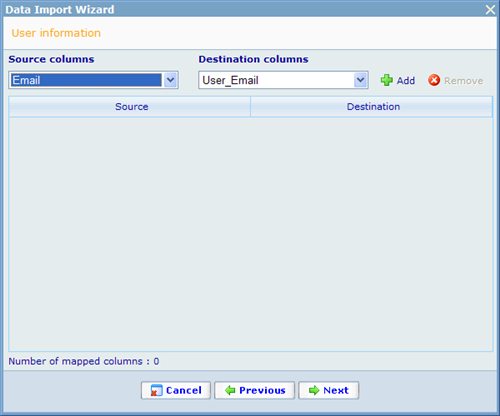
If we, for example, want to import the following file into the system for an array of users, we will see two different scenarios in step 3 of the wizard depending on whether we chose auto-map or not.
Below is shown how it will look if auto-map is enabled.
If auto-map is not enabled nothing will be mapped as shown below.
Advanced mode: Check this check box led us to the advanced mode containing more detailed information that you may import to users. Generally most of the columns require that you know exactly what you are doing or you may cause some serious problems to the database. If you are not a super-user, we generally advice you not to use this advanced mode feature. The available columns when clicking this check box are:
- Timereg_Enabled: click here to learn more!
- Resource_ManHour: click here to learn more!
- Disabled_Date: click here to learn more!
- Access_Expiration: click here to learn more!
- Protected_Until_Date: click here to learn more!
- Discount_Id: click here to learn more!
- Work_Setting_Id: click here to learn more!
- Timezone_Id: click here to learn more!
Some advanced columns that you can import to the questionnaire answer sheets are:
- Next_Contact_Datetime: click here to learn more!
- Question_Index_Sequence: click here to learn more!
- Sample_Rule_Id: click here to learn more!
- Status: click here to learn more!
- Priority: click here to learn more!
- Dedicated_User_Id: click here to learn more!
- Estimated_Completed_Time_Seconds: click here to learn more!
Step 3: Set group access for newly imported users
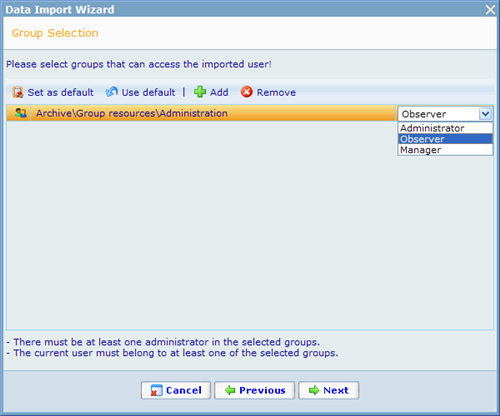
This step allows the logged-in user to set group access for newly imported users. These users must be new and imported to database. In order to import new users, user_id in step 1 must be selected. In addition, the logged-in user is required to select at least one of the following options: "import user information", "Import phone number information", "Import address information", "Import point information", "Import qualifications".
The logged in user could reach this step if he has had group navigation access already.
This grid below allows user to add one or more groups. Each group could have one of three permission level: Administrator, Manager or Observer.
The newly imported users (non-anonymous users) have to be managed by at least one group. There must be at least one administrator in the selected groups. The current user must belong to at least one of the selected groups.System would show an error message and user could not move to next step if the selected groups are not correct.
Add: Click Add to open a search control to select groups managing these imported users. These group are added with observer level as default.
Remove: Click Remove to remove highlighted groups out of the group access list.
Set level for each group: Click on level column to pull down access level list to select one of them.
Set as default: Click "Set as default" to set group access default.
An alert will tell him that old his defaults will be replaced by the current records. If he says YES
- No record selected : all will be his defaults (save to his preferences)
- Records selected : all selected records will be his defaults (save to his preferences)
- No record there : it means that user intends to clean up his defaults (save to his preferences)
Use default:
An alert tell him that current records will be cleaned and replaced by his defaults. If he says YES
- His defaults will be loaded and bound to the grid.
User's defaults will be loaded at the same time the page is loaded.
Step 4: Choosing the User Information you will import
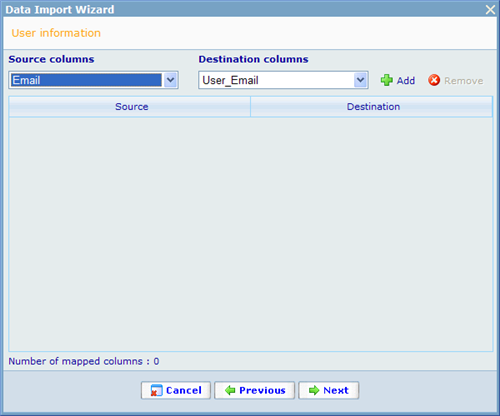
What will default have been mapped and what destination columns are available in step 3 depends fully on the actions you took in step 2. This step is only used for importing the data for user information. All data to import for questionnaires will come in step 5. Please be careful to go through all columns to make sure that they are mapped correctly. You can map more columns by choosing the source column (columns in your MS Excel file) with destination columns (the place the information will go in Catglobe). All destination columns are explained in help files for this guide so please refer to them if you are not sure how to map your data.
Beware that it is here possible to map anything with anything. But if the data do not make sense you will in the last step of the wizard be presented with an error and disallowed execution of the import job.
Step 5: Choosing the questionnaire answers to import
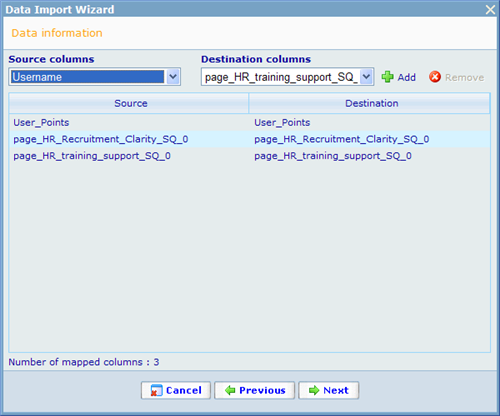
Step 5 behaves exactly the same as Step 4. The only difference between them is that step 4 is used for specifying what user information to import while step 5 is used for specifying what questionnaire data to import.
Step 6: Validation of import and final execution
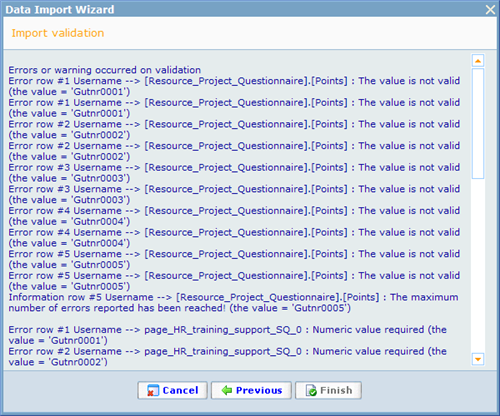
Step 5 will validate all the data given the validation rules supplied for each importable column. If there are no error (although warning message may exist) the finish button will be activated and the import job can be executed. However, if there are any error messages the finish button will be deactivated and you must correct your import rules or import file accordingly.

