The axis set editor
Now that we know what the axis set is used for and how the initial default axis set is created it is time to learn how to use the axis set editor.
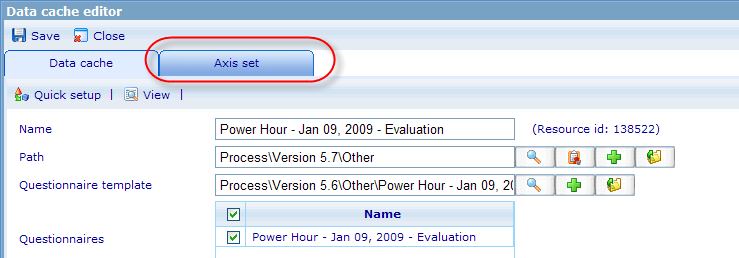
To find the axis set editor, go to the data cache specification resource list, select the data cache specification you would like to edit axis set for and open its resource dialog. You will then find the axis set tab inside this dialog.
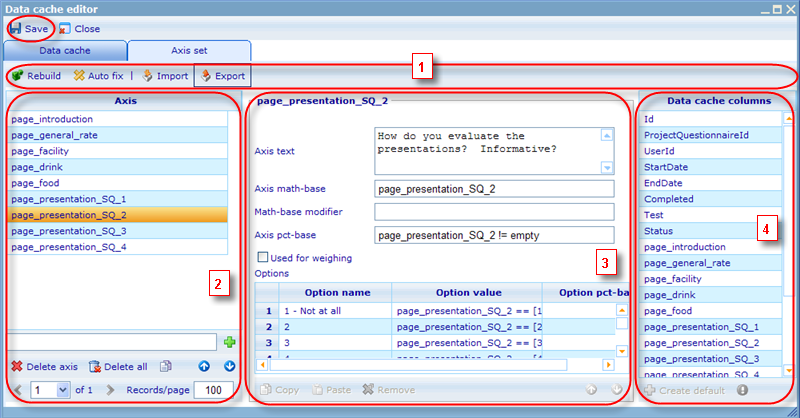
This will open the axis set editor as show below:
The editor consists of 4 main elements which are each explained in turn below!
- The tool bar
- The axis grid
- Axis properties area
- Data cache specification column grid
1: The tool bars
On the tool bar of the axis set you will find 6 buttons; namely save, rebuild, auto-fix, import and export and close. How these 6 buttons work are explained in detail below:
Save: Save the current data cache specification. It will validate the axis set based on the current data cache specification, if it is not valid, the editor will prevent saving and mark the invalid axes in red.
Rebuild: Create a default axis set for the current data cache specification and replace the current axis set with it.
Auto-fix: The editor will check whether the axis set has any invalid axes for the current data cache specification and fix them automatically.
The auto fix feature works as follows below:
For each axis in the axis set:
- If its text is empty, replace it with its name.
- For each axis option in the option list:
-> If its name or value is empty, remove it from the option list.
- If the pct-base is empty or invalid:
-> If the option grid is not empty, try to retrieve any data cache column name used in the option values, and make a default pct-base like “column_name != empty” , replace the existing pct base with the new one.
-> Else if the axis name is a data cache column name, create the default pct-base: “axisName != empty”
-> Otherwise, remove the axis from the axis set because it cannot be fixed
- If the math-base is empty or invalid:
-> Try to retrieve any data cache column name used in pct-base, and set it as math base.
Import: Will import an xml file and convert it to axis in the axis set. Please notice that it will replace any axes that may exist in the data cache already.
Export: Will export an xml file with all the axis set information.
Close: Close the axis set editor, no change is saved.
2: The axis grid
The axis grid holds the entire set of axes for this axis set. When clicking on any one you will see the values of that axis in the axis properties are in the middle of the page.
To add a new axis add it to the empty field in the bottom and click the add button (green cross button). The editor will check for duplicates and format before adding the new row to the grid. The newly added axis will have only the name as specified, all of its other properties will be empty, which means that the new axis is considered invalid based on the data cache specification until you have inserted the necessary values in the axis properties area.
We can remove one or multiple axes from the axis set at once, by selecting them and pressing Del key on the keyboard or by pressing the Delete button lying under the grid. The delete button is the red button with a white cross. We can also delete all axis at once by clicking the 'delete all' button (button with red x).
The indexing buttons enables us to sort the axes. This has an influence on the order in which they are shown in the diagrams using the axis set.
Finally we have a new button introduced from version 5.5. This is a copy button which can copy one or more axes at the same time. This copy feature is designed to make it easy to mass create a number of new axes based on existing axes where unnecessary options have been removed.
This also means that copying multiple axes will only be allowed when all the options of these axes are identically named.
The reason many users will wish to use the copy feature is to update axes that were automatically generated and which include 'Don't know' options or equivalent. These values the users will often not wish to include in calculations of statistical data nor in the actual diagrams and the copy feature therefore provides an easy way to remove these axis options and at the same time influence the statistical calculations to exclude these options.
Some of the features to notice for single axis copy are:
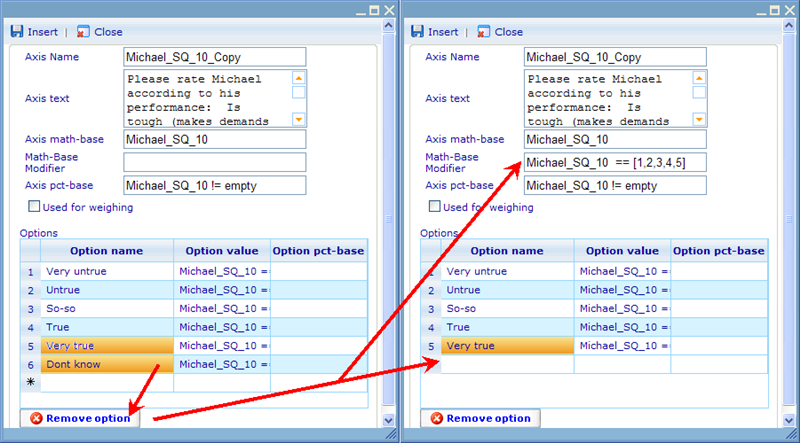
1. The automated 'math base suggestion' logic will initiate when user removes an option – it will check if all existing option values refer to the same axis (referring to just 1 axis) and all use '== n'. If not following this strict logic no suggestion will be given (column just left blank) on removal of an option.
2. The automated 'math base suggestion' logic will initiate both in the copy feature as well as if user removes an option directly in the main editor window (middle part).
3. No automatic math base updates are done on any other action (adding or editing the axis in any way).
Now let us investigate how the copy feature works when copying multiple axes:
1. To activate the wizard logic the user will highlight more than one axis and click 'Copy'. When a user highlights multiple axes; the editors middle part (axis update) just shows the first of the highlighted axes.
2. When a user clicks the 'Copy' button it will check if all the chosen axes have exactly the same number of options with the exact same option names. If they do not the wizard will give the error; “Sorry – it is not possible to mass copy functions that do not have the exact same options.”
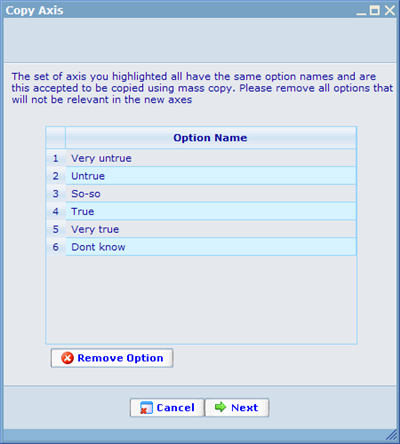
3. If it is found that the options are exactly the same, then a 2 steps wizard will open: step 1 is a step where options can be removed. There are of course no option value and option pct-base shown, since these may differ between the chosen axes. User cannot do anything but remove axes. He is allowed to remove as many as he wants and whichever he wants as long as there is at least one option left.
He will then move to step 2.
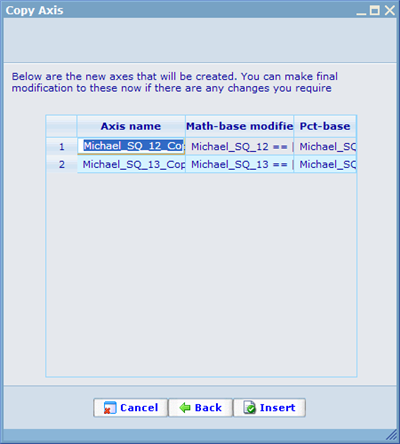
4. In step 2 of the wizard the user will see some of the information that were 'auto-generated' for the array of new axes that are to be made. This auto-generation follows the same logic as when a single axis is being copied and any options were removed.
5. The user can then finally update option names, math base modifiers or pct base. Before inserting these values in the axis list we will validate that names are unique and that the math base modifiers and pct bases are legal expressions. The values that cannot be viewed in step 2 of the wizard (weight, axis text, math base, option pct base, option value will be the same as the axis they originally came from). Of course any axis removed in step 1 of wizard is not included.
3: The axis properties area
When an axis is selected (highlighted) in the grid, its properties will be shown in the axis set area on the right side of the grid. The following values can here be defined:
Name: Name of the axis is shown in the title of the field set; we can rename an axis by double-clicking and editing it directly from the grid.
Text: The axis text is displayed in a multi-line text box. It cannot be empty.
Math-base: The math base is shown in a text box, it must be a valid data cache column name, and there is a validation for checking if it has the right format.
Pct-base: The pct base is displayed in a text box, it must be a valid CGScript expression based on the current data cache specification.
Used for weighing: Specifies whether the primary data cache column (mainly the math base) used for that axis can be used for calculating weights. If set to true then the axis name will appear as a weight choice when setting up reports and diagrams.
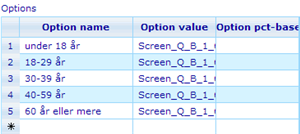
Option Grid: All options belonging to the selected axis will be displayed in an option grid.
We can add a new option by clicking the new row entry of the grid (the last row marked with * index). The option name cannot be empty, and the option value must be a valid CGS expression. The pct-base expression can be left empty in which case it will inherit the percentage base from the axis.
We can edit an option by double-clicking and editing directly on the grid. We can further remove one or multiple axis options at a time by highlighting the options to be deleted, and pressing Del key on our keyboard or by pressing the Remove option button lying below the grid.
Finally we can copy and paste options with the Copy and Paste buttons. To paste in a specific location highlight the record under which you want the copied option.
4: The data cache specification column grid
All the columns belonging to the data cache specification will be listed in the data cache columns grid so we can easily refer to these when editing axis or creating new ones. Two buttons are available for this grid:
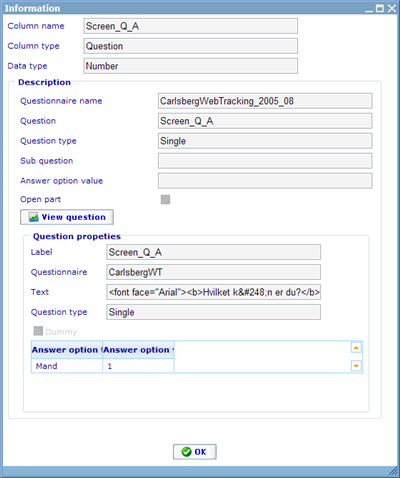
View information: We can view the properties of a column by selecting it from the grid, and clicking Information button to see more information on the question from which the column was created.
Create default axis/axis option: We can create a default axis for a question column or a default axis option for a group or sample column by selecting it from the data cache columns grid and clicking the Add Default button. If there is already an axis existing with the same name, the editor will ask if we would like to replace the existing one with the new one.
Back to: The axis set

