=Creating a CATI outcome set=
In order to create a new CATI Outcome Set you need to take the following steps:
From the “tools” menu in the lower left corner of your screen, select Administration -> Questionnaire -> CATI -> CATI Outcome Set.
You will be presented with an interface similar to the one shown in the image below.
This interface shows all the CATI Outcome Sets that exist in your system. Each CATI Outcome Set has a number of options which will be available if you use the Set in connection with a CATI questionnaire. You can see the number of options in the second column of the list. The third column shows whether the set is active or not. If a set is not active it will not be available to choose when deciding on a set for a CATI questionnaire.
- If you want to add a new CATI Outcome Set you should click the “Add CATI outcome set” button.
- If you want to edit a CATI Outcome Set you should highlight the CATI Outcome Set in question from the list and click the “Open” button.
- To delete a Set, highlight a record in the list and click the “Delete” button. You can only delete CATI Outcome Sets which are not in use by a questionnaire.
- The “View status options” button will make it possible to add, edit and delete options related to a CATI Outcome set.
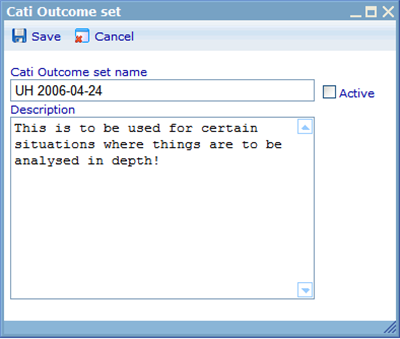
When you open or edit a CATI Outcome Set you will be presented with the following dialogue.
In this dialogue you must give your CATI Outcome set a unique name. If you would like the Outcome set that you are creating to be available from questionnaires, then you must set it to active. Finally, you can describe your set and the uses for it in the description field.
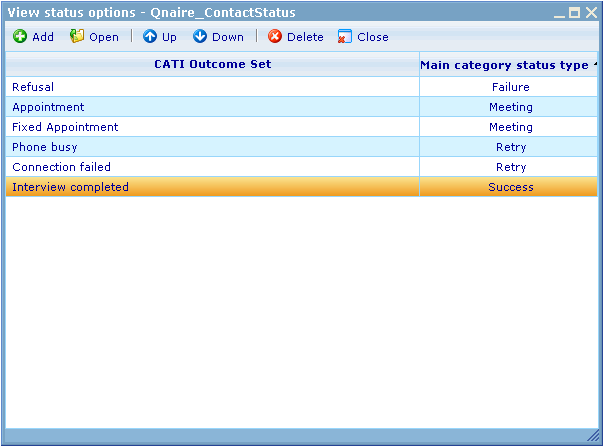
When you view options in an outcome set you will be presented with the following dialogue.
This dialogue shows all the options in your outcome set. The name of the option is shown in the first column and the main outcome type in the second column.
You can add new options by clicking “Add”. You can edit existing options by highlighting them in the list and clicking “Open”. You can delete options by highlighting them and clicking “Delete”. Options that have already been used in connection with a survey cannot be deleted.
The list of options in the outcome set will be shown for Interviewers in the same order in their outcome drop down as is indexed in the list. You can change the indexing by using the “up” and “down” arrows while highlighting the option you want to index differently. You should place the most used options on the top and the least used options on the bottom of the list.
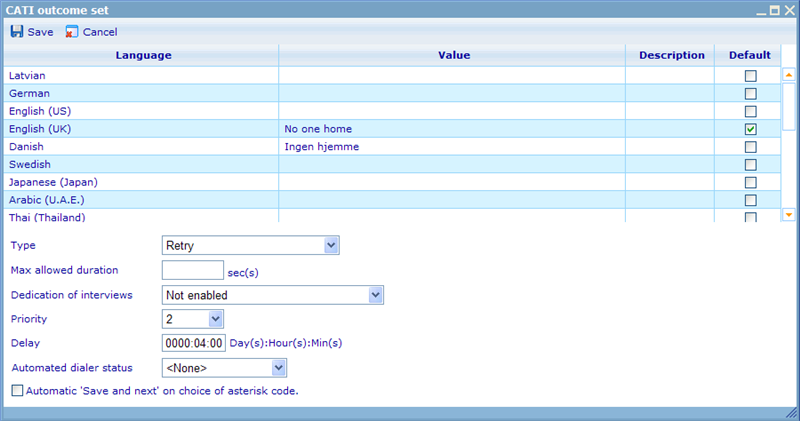
When you add or open an option you will be presented with the following dialogue.
Depending on the type of outcome you choose the available fields under this drop down will differ.
We will therefore first describe the choice of language and thereafter the different options under each outcome type.
Since an outcome set can be used by interviewers speaking many different languages we will also need the flexibility to show the options in different languages. If interviewers log in that are stated to have a different language than the ones for which you have specified values, they will be shown the default language value. The default value is chosen by clicking the “default” checkbox on the right.
Finally, you can also write a description of the reason for choosing each value when doing interviews. This can also be done in multiple languages.
Now that you have given your option a name, you need to specify the main type of option you are creating. There are four types of options which are described in turn below.
Main type: Success
When an interviewer chooses a status of type Success then he is indicating that the respondent actually completed the questionnaire. It is only possible for an interviewer to save with this status if the system actually registered the respondent to have completed the questionnaire. You should therefore not specify options as success even if you see a partially completed questionnaire as a success in some cases. The choice of type is only a system definition of how saving an interview with this type will be handled by the system and does not actually change the data or restrict us from using the data that was collected.
Main type: Failure
When you specify an option as a failure it will mean that the respondent will not be called again by your respondents in connection with the specific questionnaire.
Main type: Meeting
Choose this type when you need the interviewers to enter a specific date and time for when they should call the respondent again.
Main type: Retry
Choose this type when you need to try to call the respondent again, and depending on the specific option you choose you can state the delay for when this should happen compared to now.
Variables that can be set
For each type there are a number of variables you can further set. Each of these variables will have an impact on how the interview and the respondent will be interacted with afterwards. The different variables are explained below:
|
Name |
Used for |
Description |
|---|---|---|
|
Max allowed duration |
Success Failure Retry Meeting |
Specifies the max amount of time we expect this option to have taken. This is for analytical purposes so we can ensure that interviewers have not taken a pause without using the pause button of their interviewer screen. If users consistently use longer time than max allowed duration it will be “caught” using the analytical features of the CATI live monitor |
|
Protect duration |
Success Failure |
Here you can state how long we will “protect” users from being interviewed for another questionnaire after receiving this outcome from the current interview. |
|
Blacklist |
Success Failure |
If a respondent after being contacted does not want to ever be contacted again you should check this option. The result of an interview ending of with an option where this is checked will be that ALL the respondents phonenumbers will be blacklisted forever or if so specified, for a specific period of time. |
|
Dedication of interviewers |
Retry Meeting |
For some meeting or retry types we may need the same interviewer or a specific interviewer to make the next call. For this situation we have the setting “Dedication of interviewers”. There are three possible values you can choose for this setting, namely “Not enabled”, “Dedicate to logged in interviewer”, and “Interviewer can dedicate”. Not enabled means that the next call for this respondent is not dedicated to any particular interviewer if this option is chosen. Dedicate to logged in interviewer means that it is the interviewer who choose this option as an outcome of the interview who will also take the next interview with this respondent. Interviewer can dedicate means that the interviewer must choose whom the next interviewer to call the respondent is. |
|
Priority |
Retry Meeting |
In priority you can choose a value from 0 to 10 which states the priority of taking the next interview with this respondent. If there are multiple respondents during the same time that need to be called then the one with the highest priority will be chosen first. |
|
Delay |
Retry |
When something happens that makes it necessary to call a respondent again, it may be very different how long we want to wait to do this. If the option regards calling again because the line was busy the delay may be set to 10 minutes whereas the delay may be, for example, 4 hours if the reason we try again later was caused by no one taking the phone. |
Automated dialer status
From version 5.6 there will be an additional setting on outcome sets that will only be shown on the activation of the web configuration key called AsteriskEnabled. This setting is called "Automated dialer status" and is used by Catglobe to automatically set the outcome status of calls where the auto-dialer phones can recognize what happened with a call. An example would be that we had an outcome status called "No answer". If the auto-dialer phone registered that no one answers the phone it can then send this information to the interviewer screen that will then automatically change the status to "No answer" in the outcome status choice. If then the field "Automatic 'Save & Next' on choice of asterisk code" is set to true, then the system will also automatically click "Save and next" for the interviewer.
This will mean that the interviewer will need to use less clicks on the interviewer screen to do his work than before.
The choices in it will depend on the main type chosen for the outcome status. The choices are as below:
|
Auto dialer status |
Outcome types it can be used for |
|
Answer |
Success, Failure, Retry, Meeting |
|
Busy |
Retry, Failure |
|
No answer |
Retry, Failure |
|
Cancel |
Retry, Failure |
|
Congestion |
Failure |
|
Channel unavailable |
Retry, Failure |
|
Do not call |
Failure |
There is generally one status for which we propose you do not use "Save and next". This is Answer, which may require the interviewer to carry out an interview or talk to the user before final choice of outcome and can thus not be allowed to automatically continue immediately.
The system will ensure that an auto dialer status can only be used once per outcome set. You should if possible make sure to allocate each of the 7 states to one of your outcome statuses.


