More actions
Questionnaire layouts
You cannot create a questionnaire without attaching it to a questionnaire layout. Layouts are used to show where the questions is placed, what fonts are used, background colors, logos and everything else that decides how the graphical representation of the questions will look.
To create a new layout we must first create layout templates. Both layouts and layout templates are accessed from Tools->Questionnaires.
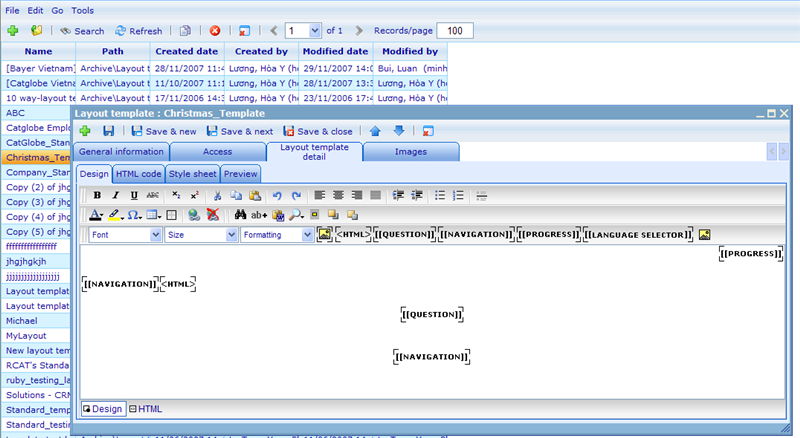
Questionnaire templates are resources and represented in a resource list, as shown below.
The general information of a template is only name so we will continue with describing the layout template detail tabs shown in the above.
The design tab is the main editor where you can set up the template using a typical HTML editor. If you want to modify the HTML directly you must use the 'HTML code' tab, which will show you what you made in the design tab.
There are a number of 'place holders' that should be put into your design so the system knows where to place certain objects. These are input using buttons that is seen on the 3rd level tool bar next to the text formatting drop downs. Place holders to use are:
[Question]: Required. Will specify where the question will be placed on the page.
[Navigation]: Required. Will specify where buttons to navigate between questions will be placed.
[Progress]: Optional. Will place a progress bar showing users how far they have reached in finishing answering the questionnaire.
[Language selector]. Optional. Will place a language drop down making it possible for users to change the language in which they view the questions.
![]() : Optional: Will place a image tag that can be used for e.g. replacing with a specific company logo when updating the layout for a questionnaire. Notice that there is also a regular image button that will just immediately insert an image into the template.
: Optional: Will place a image tag that can be used for e.g. replacing with a specific company logo when updating the layout for a questionnaire. Notice that there is also a regular image button that will just immediately insert an image into the template.
[HTML] Will insert a place where users making layouts using the template can insert html.
You can create a style sheet to support your HTML settings on the style sheet tab. Below is an example of a style sheet created for the layout template.
<tbody> </tbody>
|
Example |
Explanation |
|
BODY { background : #ffffff; font-family : sans-serif; font-size : x-small; color : #333333; } |
General styles for everything General background color General font type General font size General font color |
|
.option_table { font-size : x-small; font-family : verdana; width: 0px; background : #ffffff; } |
General table styles |
|
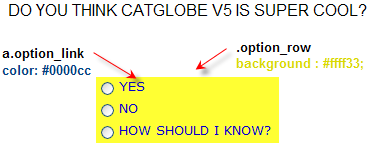
.option_link { font-size : x-small; font-family : verdana; color: #ffffff; } |
General answer option text styles |
|
a.option_link { font-size : x-small; font-family : verdana; color: #000000; } |
|
|
a:hover.option_link { font-size : x-small; font-family : verdana; color: #000000; text-decoration : none; } |
|
|
.grid_subquestion_text { font-size : x-small; font-family : verdana; color: #000000; } |
Influences settings of sub question text. Can be overruled by the settings |
|
.grid_answeroption_text { font-size : x-small; font-family : sans-serif; color: #333333; } background-color: transparent; border : thin solid #cccccc; border-bottom-style : solid; font-family : sans-serif; font-size : x-small; color : #333333; } background-color: transparent; border : thin solid #cccccc; border-bottom-style : solid; font-family : sans-serif; font-size : x-small; color : #999999; } |
|
|
.option_row { font-size : x-small; font-family : verdana; color: #000000; border : Fuchsia; background : #ffffff; } |
|
|
.option_row_even { font-size : x-small; font-family : verdana; background : #000000; } |
|
|
.option_row_odd { font-size : x-small; font-family : verdana; background : #999999; } |
|
As you will see there are a large number of classes that you can define in your style sheet which will specify how things will look in your final layout. You can of course also define your own classes for use in your html. Below is a complete list of possible classes.
|
Classes |
Example of styles to set |
|
errorMessages |
Here you can set standard text styles |
|
question_text |
Here you can set standard text styles |
|
grid_question_text |
Here you can set standard text styles |
|
grid_answeroption_text_[gridIndex + 1] |
Here you can set standard text styles |
|
grid_subquestion_text_[gridIndex + 1] |
Here you can set standard text styles |
|
option_table |
Here you can set standard table styles |
|
option_link |
Here you can set standard text styles |
|
option_row |
Here you can set standard table styles |
|
option_row_even |
Here you can set standard table styles |
|
option_row_odd |
Here you can set standard table styles |
|
grid_outer |
Here you can set standard table styles |
|
grid_inner |
Here you can set standard table styles |
|
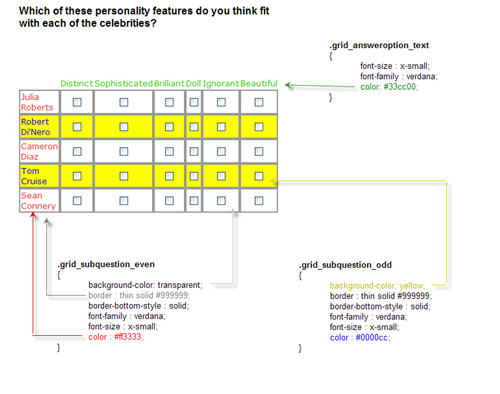
grid_answeroption_text |
Here you can set standard text styles |
|
grid_subquestion_text |
Here you can set standard text styles |
|
grid_subquestion_even |
Here you can set standard table styles |
|
grid_subquestion_odd |
Here you can set standard table styles |
You can review your template while developing it on the 'Preview' tab. Once you are satisfied you must create a layout using the template which can be linked to a questionnaire. Let us see the questionnaire layout screen!
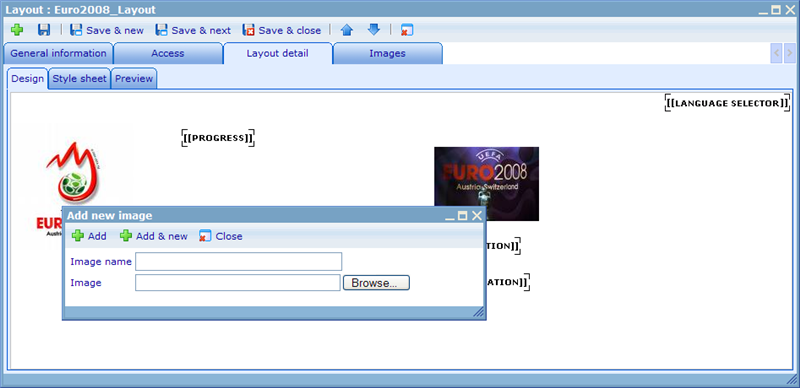
On the general information tab you must choose the layout template that will be used as the basis for the layout. Once you decide on this the tabs under layout details will be updated.
The difference between layout templates and layouts is, that you cannot set up the HTML for layouts. Rather it will be possible to click on the HTML and Image place holders to decide what to put in them. Above is an example of opening the image placeholder. They will further fully inherit the HTML from the templates. The thing you can further update for layouts is the style sheet. By default you will be given the same style sheet as that of the template you are using, but you can then modify it according to your demands.
Pages in category "Questionnaire layouts"
The following 22 pages are in this category, out of 22 total.
S
- Style sheet setting: answer option cell
- Style sheet setting: countdowndisplay
- Style sheet setting: errorMessages
- Style sheet setting: grid answeroption text
- Style sheet setting: grid answeroption text i
- Style sheet setting: grid empty cell
- Style sheet setting: grid inner
- Style sheet setting: grid outer
- Style sheet setting: grid question text
- Style sheet setting: grid subquestion even
- Style sheet setting: grid subquestion odd
- Style sheet setting: grid subquestion text
- Style sheet setting: grid subquestion text i
- Style sheet setting: multimedia question content
- Style sheet setting: option link
- Style sheet setting: option row even
- Style sheet setting: option row odd
- Style sheet setting: option table
- Style sheet setting: page question text
- Style sheet setting: question content
- Style sheet setting: question outer
- Style sheet setting: question text


