Task sets
When you are working with a project, you often have a set of standard tasks that need to carry out in connection with it. This could for a sales project be the sending of a proposal, the registration of the client’s information, a follow up call and so on. In order to ensure that the users remember all the tasks that need to be carried out and in order to minimize the work needed to add all these tasks to a resource, we offer a feature called tasks sets that enable you to pre-define sets of tasks and add them flexible to resources.
Task sets can thus be seen as two main features, one for creating task sets and one for adding them. Each of these two features will be explained in turn below.
Creating task sets
To create new task sets choose the task set module under Tools-> Projects and folders.
You will see a standard resource list holding task set resources. You can give access to task set resources so that only relevant users get access to the ones you make. The list also has a lot of the other standard resource features which you can read more about in the managing resources help file.
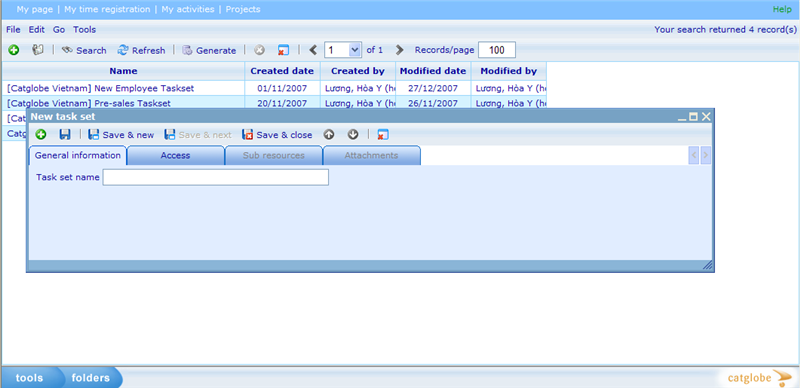
When you click add you will get a very simple dialogue with just the need to specify a task set name. Give a name that identifies the process your task set supports and click the save button (not save & close!).
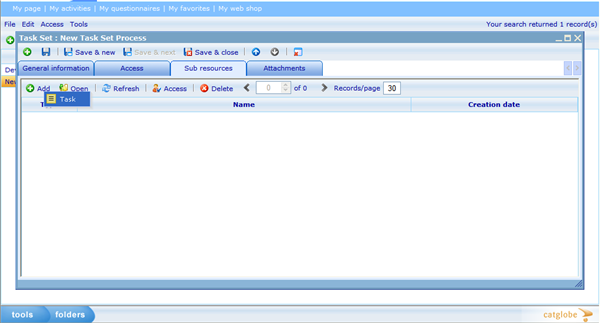
Once you click save the sub resources tab will appear. It is on this tab that you will add your tasks to your task set.
The tasks resources you add to task sets are a lot different from the tasks that you normally add to resources. These “Tasks Set Tasks” (TST) are meant to be converted to real tasks when the task sets are added to resources and thus are inactive (not shown in e.g. MyActivities) at this stage.
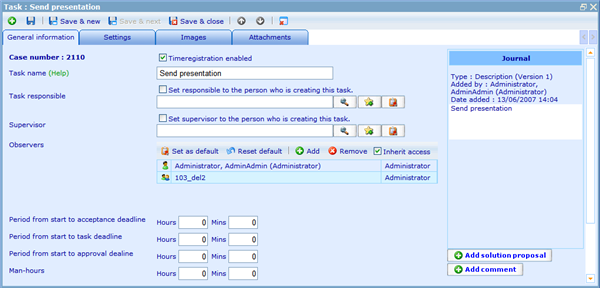
Each of the information to add to a TST is explained below:
Time registration: The value you specify here will only influence the TST, not the generated task. If this value is checked the TST inherits access from the Task Set resource.
Task name: Make sure each task in the task set have unique names. You can add the four keywords [PID], [PNAME], [RNAME] and [ID] to the task name. [PID] will be replaced by the project code for the nearest parent project (i.e. it does not have to be the direct parent if this is not a project type resource). [PNAME] works the same way as [PID] except that it instead searches for the nearest parent that is a project in order to replace the tag with the project name. [RNAME] will be replaced by the name of the parent resource that you are adding tasks to. If there is no parent or parents parent that is a project type resource then the keywords [PID] and [PNAME] will be ignored. [ID] in the name is replaced by case number on creation of the tasks.
Task responsible: You can choose three different actions here. You can either do nothing, in which case, no default values will be available when converting the TST to a task. You can also check the checkbox “Set responsible to the person who is creating the task”, in which case the person adding the Task Set to a resource will have his name set as responsible as the default value. Finally, you can choose to specify the exact person or group that should be responsible for the task by adding his name (or group’s name) using the light search control.
Supervisor: You can choose three different actions here. You can either do nothing, in which case, no default values will be available when converting the TST to a task. You can also check the checkbox “Set supervisor to the person who is creating the task”, in which case the person adding the Task Set to a resource will have his name set as supervisor as the default value. Finally, you can choose to specify the exact person or group that should be supervisor for the task by adding his name (or group’s name) using the light search control.
Observers: If you wish some people to always see the tasks created from this TST then you can add them as default observers. The set as default button will mean that any new TST you create will have the highlighted user or group as defaults as well. The reset default button will remove any defaults that you have so that next TST you create will have no default observers. The reset default does not affect the current TST you are creating or how the default observers will be added to tasks created from this TST.
Inherit access: This will affect the default setting of tasks created from this TST.
Period from start to acceptance deadline: In the dialogue for adding task sets it is possible to state a “start date and time” for the entire task set being added. By adding a “hour:minute” value to this field we can specify how long time after the start date and time that this TST should be accepted by.
Period from start to task deadline: In the dialogue for adding task sets it is possible to state a “start date and time” for the entire task set being added. By adding a “hour:minute” value to this field we can specify how long time after the start date and time that this TST should be completed by.
Period from start to approval deadline: In the dialogue for adding task sets it is possible to state a “start date and time” for the entire task set being added. By adding a “hour:minute” value to this field we can specify how long time after the start date and time that this TST should be approved by.
Man-hours: We can here specify a default time for how long tasks created from this TST should take.
Journal: Any journal entries added to this TST will be copied to a created task.
Settings tab: This is identical to the settings tab on regular tasks. It will specify the default values when tasks are created from this TST.
Images tab: Any image added to this TST will be copied to a created task.
Attachments tab: Any attachment added to this TST will be copied to a created task.
Once you have created a number of TST for your task set it is time to add them to resources in the system.
The add task set wizard
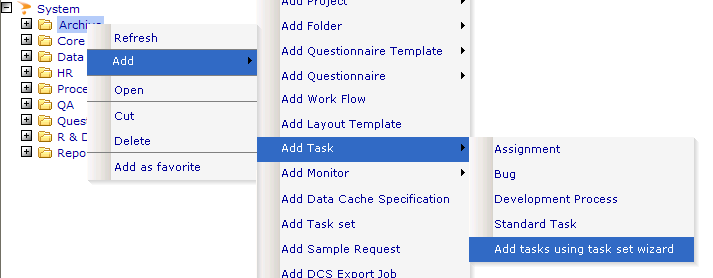
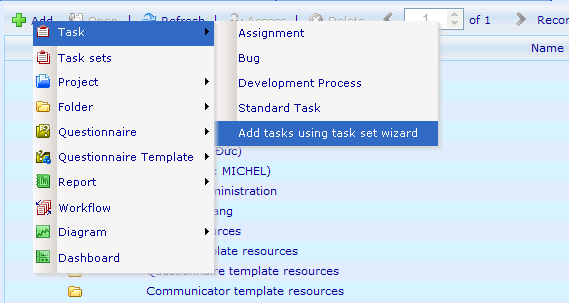
There are three places we can add/generate task sets from. One is in the folder tree as shown below.
The second is from the sub-resources tab.
And the final is directly from the task set resource list by clicking the generate button. Doing this we will be forced to choose the path we wish to locate the tasks in.
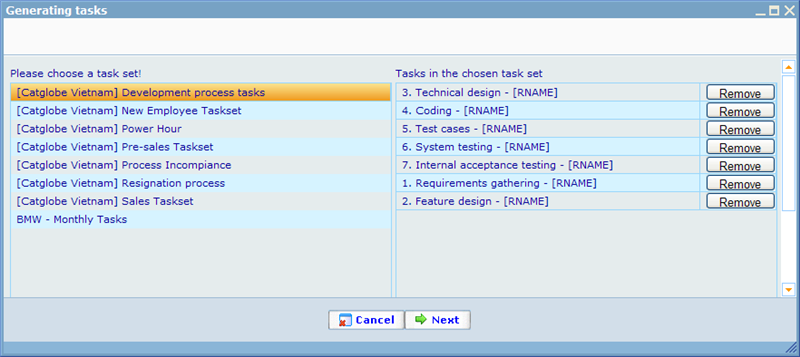
Once we choose to add the task set to a resource we will be shown step 1 of the add task set wizard as shown below.
In this step we must choose which of our task sets that we wish to utilize. By double-clicking on any of the tasks in the left side, the TST of that task set will be shown in the right side. If there are any of the TST that you do not want converted to tasks for the resource, you can remove them from the left list. This does not affect anything but this session, so next time you use the task set the TST will reappear as an option.
When you are happy with the set of TSTs you must click next, which will bring you to step 2 of the add task set wizard.
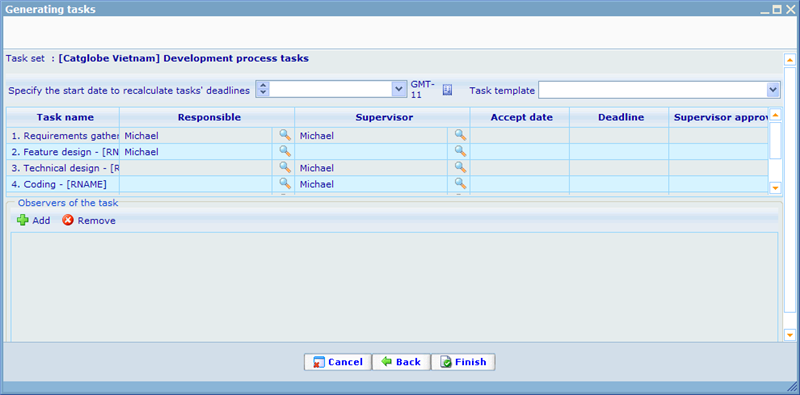
In this step you have four parts; the start date and time, the choice of task template, the list of tasks that will be created and the list of observers on tasks.
The task list is the most central element. These are the tasks that will eventually be created once you click the finish button. You can modify any cell in the grid to fit with your needs. The responsible and supervisor fields can be left empty if you do not yet want to specify any value therein. It is always possible to open the generated tasks later and do further modifications. The responsible and supervisor fields are using the favorites system as well so you can quickly insert any of your favorite users or groups.
By using the top part called “Specify the start date to recalculate tasks’ deadlines” and inserting a date and time here and then clicking the small icon next to the field, you will automatically generate dates for accept date, deadline and supervisor approval date, based on the values stated in the original TST for Period from start to acceptance deadline, Period from start to task deadline, and Period from start to approval deadline. If any TSTs do not have these values no default times will be generated and you will need to insert them yourselves. The dates are although not required.
The choice of task template is also required. The task templates that can be chosen among are all those resource templates where "requires test case" is set to false on the template. We may have a situation where a user chooses a template with required properties; this is ignored in the task generation wizard. To insert values for these required properties the user will have to open the tasks that were generated as a result of the wizard.
Whenever you highlight any task in the list it will affect the bottom part showing observers. To change observers in each task just highlight the relevant task and its current observers will show in the bottom and you can then make your changes.
When you are happy with the tasks that will be created just click the finish button and see for yourself how a number of new tasks was added to your resource!

